Changing Honda Civic Brake Pads
How to change Honda Civic brake pads and rotors!

Changing your Honda Civic brake pads and rotors is a relatively simple process that takes roughly an hour to accomplish. You should have some car know-how to pursue this, but all in all it can be accomplished very simply with simple instructions. That is what I am aiming to do here is to help you change your brake pads and rotors with a very easy to follow, step-by-step instruction, with pictures.
DIFFICULTY LEVEL: Moderately easy
TOOLS REQUIRED: Ratchet or wrench set, impact driver with Philips screw driver tip, Jack, Jack stands, C-clamp
DIFFICULTY LEVEL: Moderately easy
TOOLS REQUIRED: Ratchet or wrench set, impact driver with Philips screw driver tip, Jack, Jack stands, C-clamp
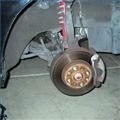
Step One: Jack the car up and put the front end on jack stands. Make sure the car is resting on the frame, otherwise you can expect to damage some parts, or seriously injure yourself. I recommend using a floor jack instead of the OEM Honda Civic jack, just because I am lazy and it takes 1/10th the effort and time.
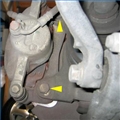
Step Two: Locate the brake line that extends from the brake caliper. It is attached to the Civic wheel bearing housing by two 10mm bolts; remove to free up the line for more room to move around later.
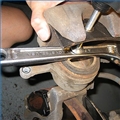
Step Three: There are two 17mm bolts holding the brake caliper bracket together. Remove these and be careful not to strip the bolts. They will require some force to loosen, as this area is generally very rusty and caked over with grime.
Step Three: There are two 17mm bolts holding the brake caliper bracket together. Remove these and be careful not to strip the bolts. They will require some force to loosen, as this area is generally very rusty and caked over with grime.
Step Four: Wiggle the brake caliper out and either hang it by a bungee cord or place it on a box as there should not be any tension placed on the brake lines. I usually just hang it behind the rotor and it sits perfectly fine.

Step Five: There are 2 Phillips screws holding the rotor, which are not necessary but come factory built. They wont come out easily. Spray some penetrating oil and wait a few minutes. You will need an impact screwdriver, which turns as you hammer at the tip, breaking the screw loose while turning. If you try it without this tool, you may end up stripping the screw at which point you will need a drill to get it out.
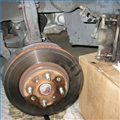
Step Six: Remove the old rotor and install the new one. Reinstall the caliper with caliper bracket. There should be 2 bolts holding the caliper on to the caliper bracket; you only need to remove the bottom bolt to access the brake pads for removal.
Step Seven: Remove the old brake pads and install the new brake pads. Apply anti-squeal paste to the surface between the caliper and brake pads.
Step Seven: Remove the old brake pads and install the new brake pads. Apply anti-squeal paste to the surface between the caliper and brake pads.
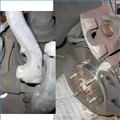
Step Eight: The caliper piston needs to be pushed back as the new pads are thicker and the pistons are likely pushed out from the old worn out pads. Open the brake fluid reservoir to allow pressure to be relieved. Use either a C-clamp or brake piston compression tool to push the caliper piston back.
Step Nine: Install everything in reverse. Calipers should be mounted at 100 ft-lb. Once everything is put back together, put your Honda Civic wheels back on, pump the brakes a few times, and drive off! You've successfully changed your Honda Civic brake pads!
Step Nine: Install everything in reverse. Calipers should be mounted at 100 ft-lb. Once everything is put back together, put your Honda Civic wheels back on, pump the brakes a few times, and drive off! You've successfully changed your Honda Civic brake pads!
- It's a good idea to check your brake fluid reservoir and make sure that no fluid leaks out during this process. In addition, you should probably bleed the brakes after installing the pads to make sure there is no air in the brake lines. Give your brakes a few pumps when you are done before starting your Honda.
- It can be very dangerous to work on a car alone. If the jack slips, it could pin you under the vehicle or worse. Always make sure someone else in the household knows what you are doing and stays nearby so they can call for help if necessary.
